Showing posts with label Housework. Show all posts

Wednesday, July 13, 2011

Refinishing- How to strip off old paint

Continuing in the current trend on this blog of pushing everybody’s race buttons as a means to celebrate the 4th of July, the Mrs and I started a project on the 3rd and continued on the 4th that set out to obliterate the self image of a young African American girl in our neighborhood.

No, not really.  Well, kinda, but we didn’t do anything wrong.

We did, several months ago, find a dresser piece abandoned on the side of the road in our neighborhood.  We took a quick look, and discovering it to be mostly solid wood, decided to take it home for refinishing.

What made it unique is that a woman we can only assume is named Deidre Hicks, based on the label inside, had decoupaged the entire surface of the thing with cutouts of African-American women from fashion magazines.  But Miss Deidre obviously no longer wanted to hold on to it, so we don’t feel particularly bad about scraping it all off.  Not that it wasn’t beautiful in its own personally significant way, but I’m not sure how we’d design a room around it.

Anyways, the biggest hurdle in the refinishing process is getting the old stuff off.

First, remove all the hardware.  There’s no reason to make the job harder for yourself by having to work around tiny pieces. 

Second, remove all the doors and drawers.  Again, the more you can eliminate the joints and crevasses where paint is inclined to be un-removable, the better.  Its easier to put it back together than to dig out all those tiny bits.

Third, apply a coat of chemical stripper with a paintbrush.  In our experience, the best practice here is to only tackle two 2’x2’ areas at a time.  Apply stripper to the first area and then let it sit while applying it to the second.  Go back to the first and it should be ready for the first scraping. It'll get all bubbly like a toxic apple pie when it's ready.

Sidenote:  I’m not a fan of safety but I can agree that rubber gloves are helpful here for the average user.  There’s a slight burn if you get it on your skin.  I would recommend the thin medical rubber gloves though.  You are going to be applying in small doses and doing a lot of scraping, so cumbersome dishwashing type rubber gloves get in the way.  None of the pictures shown illustrate the usage of rubber gloves because I'm really macho... when I'm doing a refinishing/decorating project.

Fourth, using a plastic or metal scraper, apply pressure to the bubbly mass of paint.  One long continuous motion is usually the best to get the whole way down to the wood, or as far as you can get in one stripping.  If the paint on the piece is especially soft, you may find that you can simply wipe it off with a rag.  Good on you.  It definitely keeps you from gouging the wood with a scraper, which you otherwise should wield with caution.

Fifth, repeat as necessary.  Then repeat again.  And again.  And again.  Until you get to this:
 
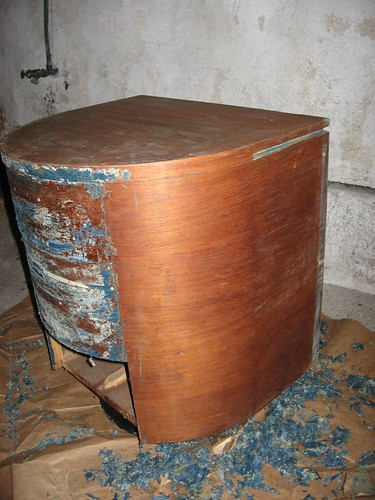
LOOK! Pretty solid oak.  Well, mostly solid.

In our case, we’re still debating what kind of finish we’d like this to have.  The more transparent finish you desire, the more paint you’ll need to get off of the bare wood.  Clear coats and transparent stains really require you to have every last speck of paint off, while fully opaque latex really only require that you create a smooth substrate for the new coat.

We’re leaning toward a semi-transparent stain, possibly in white or a colorful hue, which will still allow the wood grain to show through.  Although as I do the research, I might be interested in trying out some combination of  milk paint and chalkboard paint. Check out these shots:

Photo via Design Sponge
Photo via Casasugar

Tuesday, June 14, 2011

Collaboration

Collaboration.

One hears about it in business and creative contexts all the time.  Two entities working toward a common goal.  Sounds pretty positive, right?  It is always portrayed as such.  Look at the opening paragraph (as of 6/14/11 at Noon) from wikipedia, the most collaborative of sources, on this most buzzy of words:

Collaboration is working together to achieve a goal, but in its negative sense it is working as a traitor.[1] It is a recursive[2] process where two or more people or organizations work together to realize shared goals, (this is more than the intersection of common goals seen in co-operative ventures, but a deep, collective, determination to reach an identical objective) — for example, an intriguing endeavor[3][4] that is creative in nature[5]—by sharing knowledge, learning and building consensus. Most collaboration requires leadership, although the form of leadership can be social within a decentralized and egalitarian group.[6] In particular, teams that work collaboratively can obtain greater resources, recognition and reward when facing competition for finite resources.[7] Collaboration is also present in opposing goals exhibiting the notion of adversarial collaboration, though this is not a common case for using the word.

Wow, sounds like the solution to all the world's problems, right?

It's unfortunate that we never discuss the downsides of collaboration. 

I've been thinking a lot recently about some career goals and the major distinctions in my mind between writing as an endeavor and a host of other things that also tempt as possible career options:  (Architecture, Event Planning, Experiential Branding/Marketing.)

One thing that stands out is that writing , by its nature, does not HAVE to be collaborative.  The written or spoken word is something I can manipulate by myself.  I can craft a sentence, I can create a theme, I can prove a point, solely by the work of my own hands and mind, if I choose.  All those other disciplines, and the vast majority of careers out there require the collaboration between boards, vendors, managers, installers, etc.

The first big problem with these ventures is that in working together, one can easily lose efficiency.  If you're a rapid producer, a multi-tasker, and a quick thinker, collaboration often means slowing down for the rest of the group.  Now, sometimes, obviously this can lead to more careful reflection and critical thought, but it often just leads to not getting---things---done, while consensus is reached via arduous discussions.  Especially if one knows how to do the task at hand, deliberation between members of a group can be the albatross around your neck.

The second, less recognized problem, is that when collaborative thought becomes a goal, it has the danger of being an end unto itself, and not serving the product, but rather the participants.  Good ideas do not necessarily come from a multitude of sources.  Sometimes a good idea crafted by one person is just the best idea.  But the goal of collaborative thought can't leave that good idea alone.  It has to make sure all voices are represented in that idea and may contaminate it with other lesser notions for the sake of inclusivity.  Any number of projects I've worked on have been lessened by the layering of other personalities' opinions onto the final product, solely for the sake of nurturing egos.  I'm even including the unnecessary injection of my own ideas, which aren't always the best ones in the room. 

All this is not to say that collaboration is inherently worse than going it alone.  But in our society, it's worth reminding ourselves that sometimes the Marlboro Man is OK, working out there on the range.  He's got his task and can get it done without intervention from the masses.   And this is coming from an extrovert who both likes to be around people as much as humanly possible and works well with others when necessary.  But most of the time, I would prefer if you gave me a task and let me go about my day.  I'll get a lot more done without anyone else in the room.

Thursday, June 2, 2011

Stinkbug Eradication Techniques II

Stinkbugs!

They're still in the news and they're still all over our houses.  The House Rules post on Stink Bug Eradication Techniques has been, by leaps and bounds, the most popular post in our brief history.  But a number of readers who come to the site looking for helpful information on eradicating these nuisances are always quite perturbed when no offer is given.  The comments full of vitriol are enough to make you wonder why a stinkbug would WANT to hang out in these folks' houses.  (I guess its somewhat understandable given that it is the third or fourth hit on google when searching "Stinkbug Eradication" or "Stinkbug Extermination".  Popularity does not necessarily equal intellectual content, folks.  In fact, there is usually a reverse corollary.   Alas, popularity comes with a price.)

But now, I think I finally have a real eradication technique for the big whiners out there.  Personally, I thought the idea to eat them was highly effective, but it did lack a simple harvesting method, which the following video also covers...


You can also see the same trap here on WJAC TV out of western PA. This is of course big news in Johnstown.
http://www.wjactv.com/video/28028425/index.html

Meanwhile we're dealing with this crap in Philly...


I briefly thought this might make Johnstown look pretty damn good right about now.  But then I realized I'd rather die by homeless stabbing than boredom.  So I'll stick around here for a bit longer.

Wednesday, April 27, 2011

Dreaming of a Renovation?

As an architect, the sad news I often have to give to clients involves money.  No one likes to think about how much things will cost when they're dreaming of new renovation to their home, but its an unfortunate reality. 

But most homeowner's don't have a realistic measure of what things will cost when they are dreaming away, and that makes the sticker shock of contractor's price all the more painful.  Especially when it comes to what Architects call "MEP" work.  Mechanical, Electrical, and Plumbing... it's the stuff that makes your house WORK, but its behind the walls or cabinets or in the basement so it doesn't get much attention in the dreaming phase.

To that end, here's a brief synopsis of where your dollars will go when it comes to the real MEP nuts and bolts of a renovation. 

In order of costs, high to low...

P is for Plumbing- 

Moving plumbing fixtures, anything that requires water, hot and/or cold, and waste lines (where the water goes once you've mixed it with the dirty stuff) is probably the most expensive.  This is for several reasons:  Pipes are rigid and have to be connected at specific angles and pitches, so the work of getting them through a wall, floor, or tight space is tricky.  Plumbers are one of the highest per hour laborers, and justifiably so, because even the most experienced has to deal with a good bit of trial and error on connections. 

Plumbing fixtures themselves are expensive, and copper and cast iron aren't exactly cheap metals for pipe.  More and more municipalities are allowing PVC piping for various purposes, and some are even allowing flexible piping such as PEX. 

Another thing to consider here is that waste lines are significantly bigger, harder to move, and more prone to problems with age.  And of the big wet plumbing fixtures, your toilet and your shower or tub are going to be the most costly to move because the wasteline has to go straight through the floor, so you're often having to rip out flooring or the ceiling below.

M is for Mechanical-

 Mechanical, which pretty much covers everything that delivers heat and cooling to your home can vary widely based on the system you're working with and the space that you've got to work with.  If your heating system is supplied with hot water or steam, such as to radiators or radiant flooring, you're veering more toward the plumbing end of things and running into the same issues as above.  If your heating system is with electricity such as electric baseboard heating or electric radiant flooring systems, you veer towards the Electric costs below. 

But a lot of people have forced air systems, which can supply both heating and cooling in one package, delivered through ductwork.  Ducts are BIG honkin things, and getting them through all the cavities and walls to the location you need presents many of the same challenges as plumbing.  However, ductwork is easier to work with and you can often use flexible ductwork when you get near the end of a "run". (A "run" is the path from the heating/cooling unit, most likely in your basement, to the actual diffuser or grill that pushes the air into the room).

E is for Electric- 

Wires are tiny.  And they're easily cut and spliced together.  With the exception of some appliances that need a lot of electricity, such as a refrigerator, or a microwave, (anything that makes things hot or cold, generally) a new supply outlet can often just be connected to an existing without going the whole way to your panel in the basement.  Electricity is pretty easy to work with, even for the DIY home renovator, with some precautions. 

We would caution though that the costs skyrocket when you get to moving the panels or breakers that are the first electrical items that distribute power from the municipality power lines coming into your home.  Don't move them if you don't have to.  (And don't do it yourself, most likely.)

Thursday, April 14, 2011

Colorcharts.org

I've referenced colorcharts.org before, but it bears repeating now that we've discovered the cost/quality/time benefits of Behr Premium Plus Paint.

If you (or your daughter Dakota or your son unfortunately named Chad or Ian) simply must have the "Pretty as a Princess" color by Disney* (through Behr paints)...
But you have a coupon for Sherwin Williams or you really like Duron paints,  you can go to colorcharts.org.  Find the paint you want to match...

And then select, "Match this Color", and you'll get a series of different manufacturer's with a quantified score of how close their color is to the pretty pretty pretty target.
 Now, of course, you can always go to the Home Despot and just tell them to match the color.  But if you go to the one near our house, I can tell you they are not only completely unpleasant to deal with, but generally wouldn't know a  high gloss from a good high.  I don't trust em.

*Seriously though, we all know paint color names are funny.  But Disney, no matter how enamored I would ever become with my theoretical progeny, I will never paint a room in "Mickey's Pants", "Princess Power", or "Posies for Pooh".  I would advise my readers to use a matching color from colorcharts just out of principle.

Wednesday, April 6, 2011

Which Brand of Paint Should I buy?

I've always had an affinity for Benjamin Moore paints.  In retrospect, I'm not exactly sure why.  I felt like they performed better and lasted longer and had better coverage per gallon than anything you could buy at the Home Despot.  My wife on the other hand, has always been very turned off by the high price tag.  She is a sensibly frugal woman.  And good with a roller.  And hot.

So a recent March 2011 article from Consumer Reports grabbed my eye.  Here's the link, but of course you have to be a subscriber to access any of the important info.

(I know SOME people who like to split online subscriptions between three or four users by all using the same sign-in/password.  Those people are immoral.  They have access to great info to write blogs about, but no scruples.  The House Rules is not advocating such a practice, but if anyone has an online subscription to Zagat...)

Anyways, to give you the juicy tidbits, while Benjamin Moore was #2 for semigloss, #3 for flat/matte, and #5 for satin/eggshell, It was the Behr Premium Plus Ultra brand that scored #1 in all three categories.  Additionally, the VOC's (Volatile Organic Compounds) which we've all been taught to fear and despise like Nuclear Power and Nancy Pelosi, were approximately one half to two thirds lower in the Behr paints than the Bmoores.

But you get what you pay for, right?  WRONG.  At a range of $48-51 per gallon for the Benjamin Moore and a range of $31-34 for the Behr, a clear winner emerges.  AND, if the $30/gallon range is even too high for you, the next step down from Behr, the Premium Plus (Not Ultra) scored in the same range for only $18-25 a gallon.


The moral?  My wife is usually right.  And we're going to try Behr for while.  Which, begrudgingly, of course, means going to the Home Despot.  But as previously implied, my morals are available to be compromised.

Monday, March 7, 2011

A Good Dry Lay

During the fall, we dug up the existing brick patio at our house in order to level it with the adjacent concrete walkway and create more space in the garden bed at the top of the stairs. 


The resultant patio, while not huge, will be a nice place to yell at the SEPTA buses as they careen past our house with no regard for human life.   We're looking forward to trying it out soon.

We rebuilt the patio on a base of compacted top soil, 2 inches of gravel, 2 inches of paver base, and 1 inch of sand.  If you're interested in the process, this article from This Old House covers the basics.  The process of carting all that home in our Hyundai Elantra named Brewster is probably what put the poor fella into an early grave.  RIP.

We used the dry lay method, which trust me, is much more pleasant than it sounds...  I would add one thing to the article... per my cousin's suggestion, we added 1 part dry portland cement to every 3 parts of sand for both the base layer of sand and the final sweep layer into the cracks of the pavers.  After a few winter snows/rains/thaws, the moisture slowly seeped into the sand and really locked everything into place.  Its not as tight as a mortar bed would have been, but wowzer, is it a lot less work.

Surprisingly, even with all the upheaval of brick and sitting in a pile in the sun for a month or two, the moss appears to have survived the winter on the bricks and should splotchily cover the patio soon.  At which point we can invite the local hobbits over for elevensies.

As a result of reducing the overall size, we now have about 120 bricks left.  I tried to pawn them off donate them to my good friend Jim for his brick patio project, but apparently he didn't want to cart this insignificant amount down to North Philly.  Anyways, now we have to come up with something to do with them.


My plan is to reduce the amount of "mowing" that I do with our manual spinny wheel mower thing that has the dullest blades known to mankind.  I seriously think I could cut the grass faster with my hammer.  The only strip of grass out front is between the sidewalk and the road.  I think I'll lay a series of brick "paths" across the short distance and then infill the remaining green areas with a walkable garden.  More on that project later...

Thursday, February 24, 2011

Dish Drying Rack et al...


I had seen this great idea for a folding dish rack above the kitchen sink in Philadelphia Magazine from a house near us in Chestnut Hill.  I don't think it will necessarily be applicable in the house I'm designing but I stumbled across it while searching for precedent and idea images of kitchens to show the client.  I thought y'all might like it.  Here's some of the other kitchen shots I'm collecting...


Tuesday, February 22, 2011

Cork Floor

I'm starting work on a new project today, a residential unit over looking Rittenhouse square.  It's in the Parc building, right over the Stephen Starr restaurant of the same name.  I'm super excited about it both as I've wanted to do some residential work for some time and because among other things, check out the view...

 It's definitely winter in Philly, but once those trees green up and the park comes to life, it'll be amazing.
 Anyways, I'm already starting to think of things I'd like to do in the space.  Since the owners are wine enthusiasts, I immediately thought this product that I saw on This Old House's blog "The Hardware Aisle" would be great to use, perhaps in the kitchen.

 Cork flooring "tile", recycled from rejected wine corks, durable and stain resistant, soft underfoot, and just plain beautiful.  Heck, I'd like to put it in our kitchen too.  It'd be perfect for dancing while I'm cooking dinner... which is usually to top 40 hits of the year past.  I have great taste in flooring.  Many would say "not so much", about my taste in music.


Tuesday, December 16, 2008

This is My Grown Up Christmas List

When you grow up in a Christian home, Christmas has a meaning that supercedes materialism and presents. You spend a little more time focused on the birth of Christ than you otherwise might if the day is just about presents and food.

Of course, if you grew up in the House of K, as I did, you spend a little more time focused on early morning bloody marys and smokin cigars whilst opening your stockings and listening to Aretha Franklin turn the mother out of her rendition of "Joy to the World". If dancing and a little misting up should happen too, all the better. Most people think that Christianity and Funk/Soul and Liquor cannot coexist, but I'm living proof y'all.

(The fashion show in the youtube clip above is obnoxious, but dig the music.)

Anyways, on the materialism front, while the birth of Jesus is awe-inspiring, I'm not going to say I never wanted presents. My typical plan was to create a cross referenced list with prioritized scoring and catalog page bibliography so my parents could get me exactly what I wanted. Once I learned to use a computer, things got even more complicated.

This year, a blog I read turned me on to one item that I really want. Its too late for anyone to stuff my stocking with this and obviously this economy is ruling out $500 stocking stuffers, but fortunately One Project Closer is having a competition whereby simply writing about this "sexy fine" item enters me in a sweepstakes to win it. If I win, all I have to do is write a review, which I would be more than happy to do. (Unfortunately, I also have to link to the competition, so honestly I'm hoping nobody reads this because the more people that enter, the lower my probability.)
The tool in question is a Dewalt Track Saw Combo kit. Its got a lot of the capabilities of a table saw while also being portable. Can't do routing cuts with it, but you take the good with the bad. Anyways, I'm all about using this to cut down plywood to board up some windows while I reglaze them, making some dog gates around the house, building some small tables, helping Andy and Kim build a backing face for their salvaged TV cabinet, and a gazillion other things I can't even concieve of right now.

Anyways, Merry Christmas, only a week or so to go...
I leave you with this, which in my opinion is probably closer to what heaven sounded like on Christmas, if you can see past the 80s production values...


(I'm still kind of convinced that we'll all be black in heaven. Sigh, can't wait.)

Tuesday, November 11, 2008

The Rohde Warrior

Just before Rach and I got married, we went to The Second Mile thrift store in my ol' neighborhood of West Philly. We purchased two pieces of art deco modern furniture.

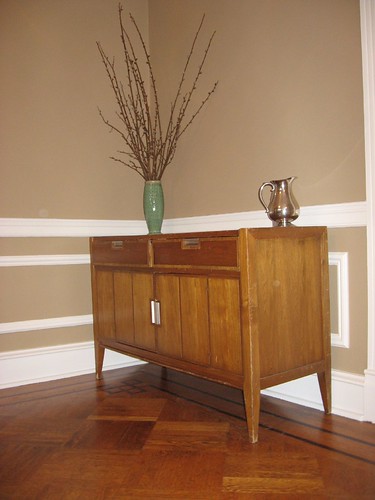
One was the dining room buffet for a measly $20 which has been mentioned before and is still awaiting stripping and restoration.
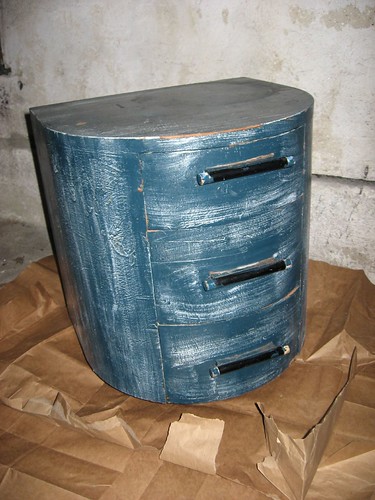
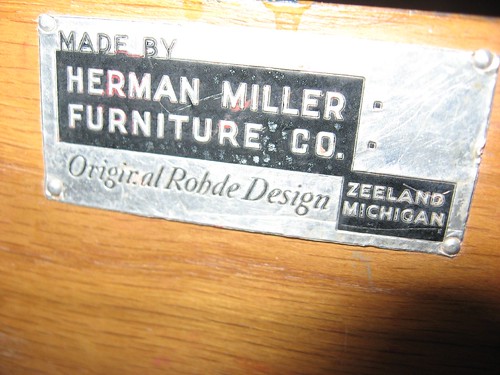
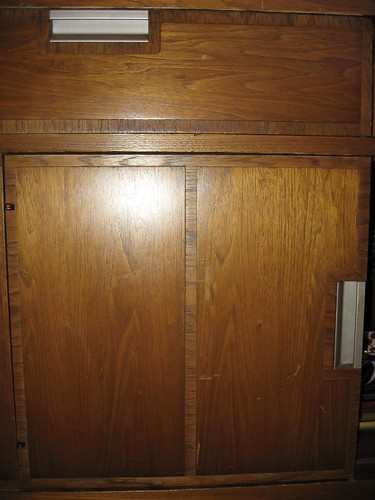
The other was a somewhat interesting little drawer unit with a really bad blue paint job for $5. We talked about repainting it and storing takeout menus inside, but never really got around to it. So when we moved into our current house, it ended up hanging out in the corner of the garage.Before tackling the buffet, which I prize for its modern lines and sweet hardware, I wanted to test out some stripping methods on the little chest of drawers. So on Saturday, I penned the dog up in the neighboring room so that he'd only get the whiff of fumes rather than actually ingesting mounds of peeled paint. I applied a coat of chemical stripper, donned my sensible rubber blue gloves, and went medieval on its a**.Only after I got past the first layer did I clear enough to see that there was a fine, and I mean "sexy" FINE walnut wood veneer underneath. I began to take more care. Once I realized that I might be dealing with a nicer piece of furniture than I'd previously expected, I searched the drawers and found this label.A little googling and we have a winner. Gilbert Rohde was a famous industrial designer and furniture craftsman in the 1930s who single handedly, by some accounts, steered the Herman Miller Furniture company aesthetic towards modernism and minimalist design. He has pieces in the Museum of Modern Art in New York, among others, and his pristine pieces go for a lot on ebay.
I'm under no misconception that I could buffer my retirement account or even buy the aforementioned skill saw with this piece. I fully imagine that I would take it to an antique dealer, much like on that Antiques Roadshow thing on PBS, and they would tell me "If only you had left the paint on, or if you hadn't kept it in your basement for a year, or let the dog pee on it that one time, it would be worth $10,512."

But it will be nice to have in the house once I clean it up a bit more. I've contacted the Herman Miller company as well as an evidently well-informed guy on flickr. (He also has a great showcase of Rohde design photos. He's an avid collector.) Hopefully they'll help me with an identification of the piece this week.

And the satisfaction that I get from knowing its not being used to store someone's crack pipes or some UPenn student's maxed out credit card collection is more than enough for me. A pile of take out menus will be a welcome inhabitant.

Tuesday, September 23, 2008

Screw U*


Check out "The Hardware Aisle" on Thisoldhouse.com...

They've got a lot of great product reviews, home improvement tips, and educational guides...

One of my favorites thus far has been Screw University* where the poster goes over all the permutations of available screw types, including shaft, head, and metalurgy.


Very helpful for designers, craftsmen, and homeowners indeed...

Although they did not cover some of the more obscure hardware types that we often discuss in my office. For example, I recently came across the term "Clevis Pin" in some structural drawings for a roof canopy and was stymied. I asked my boss what that was and he said, "I don't know but it doesn't sound nearly as interesting as finding 'Sex Nuts' all over your design." Too true, sir, too true...

Thank goodness for Wikipedia and Google clearing things up. Otherwise I'm sure I'd could be in a lot of trouble for typing "Sex Head Wood Tapping Shaft Screw Nutdriver."

Footnotes:

*This whole post also reminds me of a conversation I had with my ol' roommate Jeff once. We conjectured that there is a universal right of passage for a young boy (or girl, not to be sexist, although I think this is particular to boyhood.) There comes a time in a young boy's life, where he is working with his dad on something around the house, and Dad asks for the "male" end of a piece of hardware, extension cord, etc. The young boy is confused. Which is the "male" end? He takes a guess and then watches as his father plugs it into the "female" end of the hardware, extension cord, etc. The light of understanding goes on for the young boy and the urge to snicker at this terminology and simultaneous sex ed lesson is before him. If he can supress the urge and proceed as if this was the most natural thing in the world, he has matured and is certainly ready for a more advanced sex ed talk.**

**Or sex ed "demonstration" involving dog breeding as I was subjected to. Disturbing, I know.

Monday, September 15, 2008

Finishing Up...

Among the list of things to wrap up in the dining room is refinishing this sideboard/buffet piece... It was the first of many thrift store purchases that Rach and I made. We got it at the Second Mile in West Philly before we moved into our tiny house in Grad Hospital. It has modern Danish detailing, with concealed hinges and stainless pulls on the doors and drawers.

I've gotten a few books out of the library on refinishing, but am still stymied as to how to handle the detailing on the front panel doors and drawers. Multiple layers of different species veneer make sanding and staining problematic.
Does anyone have any ideas?

Thursday, September 11, 2008

Big Wally's Plaster Magic Review

Somebody out there has to be the guinea pig... so when I saw this review on This Old House for Big Wally's Plaster Magic, I thought I'd give it a go. Its a product for basically "gluing" your delaminating cracked plaster back to the wooden lathe behind the wall. Which is necessary if you want to keep those cracks from just reappearing through the layers of joint compound/plaster/primer/paint that you may try to cover them with.

My first goal was to call the company and try and get a free sample. I tried every trick I had in the book, including pulling out the Architect cred, citing my houseblog, etc. I'm not sure how these other housebloggers get free stuff, but I'd think between the blog and the constant specification of materials for my projects, I'd get a little love. Not so much. But everybody's got to make a buck, so I decided to bite the bullet and just buy some... I got the "Two Pack" size kit . (Not to be confused with the Tupac sized kit, which is largely overrated and is likely to induce gang warfare.) It was $63 bucks, which I hoped was worth it as it was only listed as being for 6 linear feet of crack, though I generally believe those numbers are stretchable.

Instructions and photos below are from Big Wally himself. Parenthetical references below indicate my experiential musings which relate, albeit loosely.

Step #1:
Find a crack.
(Check. I had several.)


Step #2:
Using a 3/16" bit drill holes along length of crack, 6-8" O.C. min., being careful to go only through the plaster and not into the lathe.
(Not a problem. Marked my bit with a piece of electrical tape once I had established the proper depth.)


Step #3:
Vaccum out any loose debris.
(Not inlcuded on the printed directions, only on the website. But no biggie. Due to my lack of a shopvac I did use our regular carpet vaccum. Shhh... don't tell.)


Step #4:
Spray one squeeze of proprietary conditioner in each hole, wait 10 minutes for curing.
(It did seem that for $63, they could have invented a more unique tool/fitting for getting the spray into the hole. Some sort of specialized nozzle or adaptor. But it worked, so not really much of a complaint.)


Step #5:
Inject proprietary adhesive into conditioned holes. Use about 1/2 to one squeeze of caulk gun per hole.
(This is where things got interesting.

a. I think 1/2 of a squeeze is more than enough, unless your plaster is visibly falling off the wall and the gap between the plaster and the lathe is substantial. See Notes 2 and 3.

b. One time, I was at the zoo with a friend. We went to see the big cats (lions and tigers and bobcats oh my) have their daily feeding in the cat house. It was very cool to watch them pace along the front of the cage and growl as zookeepers dropped a Porterhouse of Unimaginable Size into their cage. As we left, one of the excited and now very territorial cats exited through his "kitty door" to a small outdoor cage by the entrance. A young boy, maybe 8 or 9 years, approached the cage to watch the cat pace and growl. The cat responded to this little boy's encroachment by turning 180 degrees, lifting his tail, and marking his territory in a horizontal trajectory "Old Faithful" sized plume of urine, pheremones, and whatever other bodily fluids are part of your standard Puma olfactory graffiti tagging. The boy was saturated. He turned and began to cry. My friend and I laughed and walked away toward the monkey house to see if we could get a live re-enactment of that video of the monkey scratching its butt.

c. In many ways, the adhesive injection process was kind of like that. The first couple of times that adhesive came shooting backwards at me, I assumed that either I had over-injected or that I had misaligned the nozzle with the hole. But upon further experiments, I discovered that the adhesive was often shooting out of other holes or out of the crack itself. This led me to believe that in conditions where the lathe and plaster where just barely delaminated or not delaminated at all, (which you can't predict for each individual application hole), the adhesive was traveling behind the plaster and there was not enough cavity volume to accept the injection. Either that or the wall was marking IT's territory. Or the wall was very pleased to see me. Either way, the moral of the story here is definitely wear eye protection and clothes you don't care about losing. On to Step #6!...)

Step #6:
Wipe off excess adhesive.
(Again, not listed in the printed directions, but relatively obvious. If I were to revise the printed directions, I would probably include a note that one should wipe adhesive from the wall and then go take a shower due to previous incidents in Step #5.)


Step #7:
Clamp the wall or ceiling temporarily with screws and 2” plastic washers—bring the plaster gently back to its original plane. Allow to cure for 24 to 48 hours.
(Anyone who's ever tried to nail into a lathed surface behind a plaster wall is familiar with that bouncing sensation that means your hammer is flexing the individual lathe and your nail not finding purchase. That was a minor issue here.)


Step# 7.2
None listed.

(What? No 7.2? In addition to this being the requisite beer/cigar break time, the printed directions should probably also mention that after clamping, additional adhesive will slowly seep from the holes. And while the directions say that dried adhesive can be removed with a putty knife, I can tell you that said scraping can do quite a bit of damage, pulling little chunks of plaster away with it. Another cleaning after the clamps sit for a few minutes, or the length of the aforementioned cigar/beer, would minimize this impact.)


Step #8:
Carefully remove clamps and fill holes with joint compound.
(Again, as I said above, get the glue off the wall first. It does not sand down well. Additionally, you may want to save those clamps for future use. More on that later.)


Step #9:
Sand, prep, and paint.
(Check. Check. And Check.)


The end verdict is basically positive. Big Wally really secured all of the cracks quite well. If you get up close to the wall, one can see some divits from the glue application holes which would have been minimized by a more thorough cleaning instruction, but not too shabby from a few feet back. (There was a crack running from the top of the door lintel on the right down to the inside corner at bottom left, just above the chair rail.)


The price seemed high, although I think I could have stretched it if not for the spontaneous adhesive eruptions. Although, Wally, you should really consider selling the adhesive tubes alone, since I now have a bevy of clamps and conditioner for future projects but the adhesive went fast. As a result, I'll probably give some standard construction adhesive a shot before ordering another Tupac kit.